Coordinates:
The most important windows in MacMolPlt are:
Each of these windows can be opened or brought to the front (the Main Display window can not be closed without closing the file) through the subwindow menu. Each file that is opened has its own set of windows.
The main display is the master window for each file (or unsaved set of data). It is where the molecule is displayed along with normal modes and surfaces. At the bottom of the window on the left MacMolPlt prints out the energy and/or the current frequency. On the left is a scroll bar which indicates which frame in a series of frames is being displayed. In the main part of the window is the molecule display.
Mouse control: (On the Mac the command key is the usual Apple key, on Windows and Linux it is the control key)
There are many options effecting the molecule display. These options can be found under the View menu or in the Preferences window. These options include ball and stick versus wire frame style display (You can get a space filling display with ball and stick mode by increasing the atom size in the preferences), atom labels (symbol and/or serial number), normal mode display, zoom, orientation and more.
There are several annotation you can add to the molecule display. These including marking an atom (to make it stand out), displaying the length between two atoms, displaying the angle between three atoms and displaying the dihedral angle formed by four atoms. In each case select the approriate number of atom(s) then either right click on one of the selected atoms or choose the action from the Annotations submenu under the View menu. To delete an annotation right click on it or choose the Delete All Anotations item in the Annotations submenu.
You can copy and paste image directly from MacMolPlt into other applications, however For better printout I suggest use the image export option with a resolution of 300 dpi and then import the file into the other application. This will provide good quality when printed out later.
Note that the following keys have special functions:
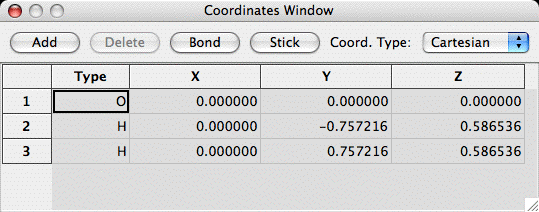
The coordinates window displays the current set of coordinates for the current frame. The coordinates can be displayed as cartesian coords or as gaussian style internal coordinates (as shown above). To edit any value simply double click on that value. The Main Display will be updated as soon as you finish typing and hit return or tab or click outside the edit field. The controls at the top of the window do the following (in order from left to right):

The bonds window allows you to add or delete bonds or change the bond type. The bond type has no signicance to MacMolPlt other than the color and pattern used to display the bond. The color and pattern for each bond type can be modified in the Preferences window.
The energy plot is a simple window to display the energy for each frame relative to that for all other frames. Look in the preferences dialog for options to plot the kintic or potential energy and the MP2 and total energy. In addition you can plot functions of a geometrical parameter such as a bond length or bond angle, or the RMS or Maximum gradient. You can also change the energy units and define a reference energy to use as the zero energy. Colors and indicator size can also be defined. When you export energies you actually export any information currently displayed in the displayed units. Thus, you can obtain a list of bond lengths or bond angles by plotting them and then exporting the data.
The frequency plot is a simple line graph showing the infrared intensity versus the frequency. If the intensity is not known then all frequencies are plotted with an intensity of 1.0. Note that you can also export the list of frequencies and intensities.
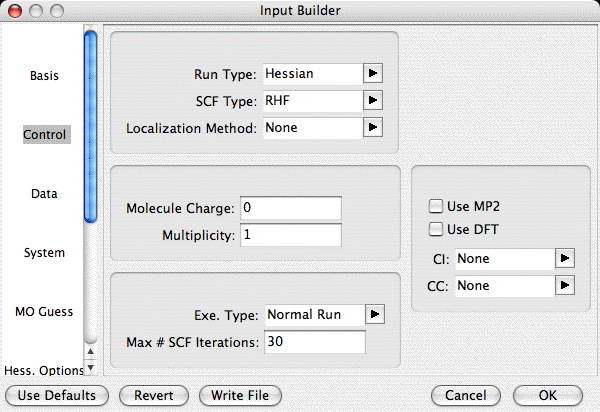
The Input Builder window allows you to setup many of the options needed to create a simple GAMESS input file. Many of the GAMESS groups and options are not yet present, especially for more advanced options. There is balloon help for most options, so the best way to get started is to turn on balloon help and then look around at the different items. All of the options which are visible are implemented, but there may be options which are unavailable in the input builder, but still needed to get a correct GAMESS run.
The basic design of the input builder window is that the most important input options (the required groups) are listed at the top left of the window. These are groups that you should always check before creating an input deck. The second list contains groups for which the defaults are generally adequate (thus they are optional). These lists are not constant. New groups are added and removed depending on options you select. For instance, if you select an MP2 wavefunction type then an optional MP2 group will be added to the optional groups list.
Once you have selected all of the options that you need you can click the "write file" button, which will prompt for a file name to write the GAMESS input file. All of the options which you have set will be written to the file, but options which are unchanged from their GAMESS defaults are skipped. The coordinates for the current frame will be punched out into the $DATA group. You should examine the resulting input file and make sure that all required options are present.
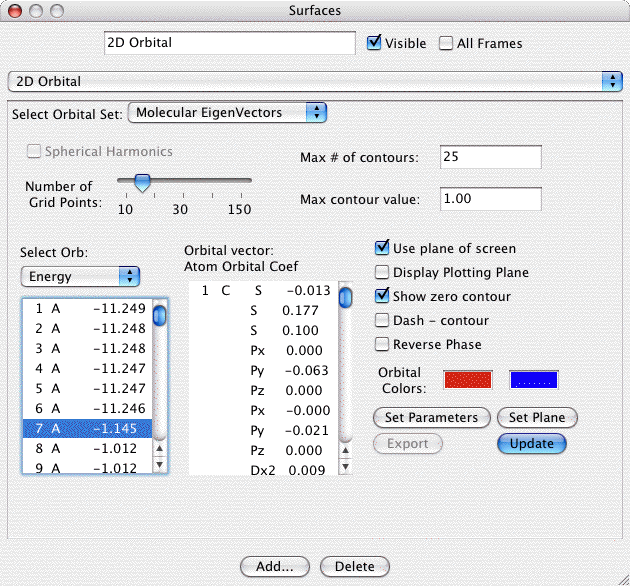
The surfaces window allows the create/deletion and modification of all supported surface types. For information on specific surface options refer Surfaces Page. There are several controls common to all surface types. The common functions are:
A great many features in MacMolPlt are customizable including atom colors, sizes and patterns. There are three levels of preferences. The first provide the initial defaults and are placed within the application bundle. The defaults are present in any complete installation and are thus read first. Next the user modified defaults are read in. The user defaults are edited with the "Global Preferences" menu item in the Edit menu (or app menu on the Mac). Finally each file has its own set of preferences which are inherited from the user default preferences. The file specific preferences are edited using the "Preferences" menu item under the "Subwindow" menu.
To setup the defaults as you like them to apply to future documents edit the "Global Preferences". In that preferences dialog there is a button at the bottom to apply the defaults to all open windows to make them visible. You can also restore the "factory defaults" if needed to reset an item.
The preferences associated with each document are saved as part of the document. Thus you can tune the options for a specific file and give that file to others and they will see the same options rather than any defaults they might have set on their system.